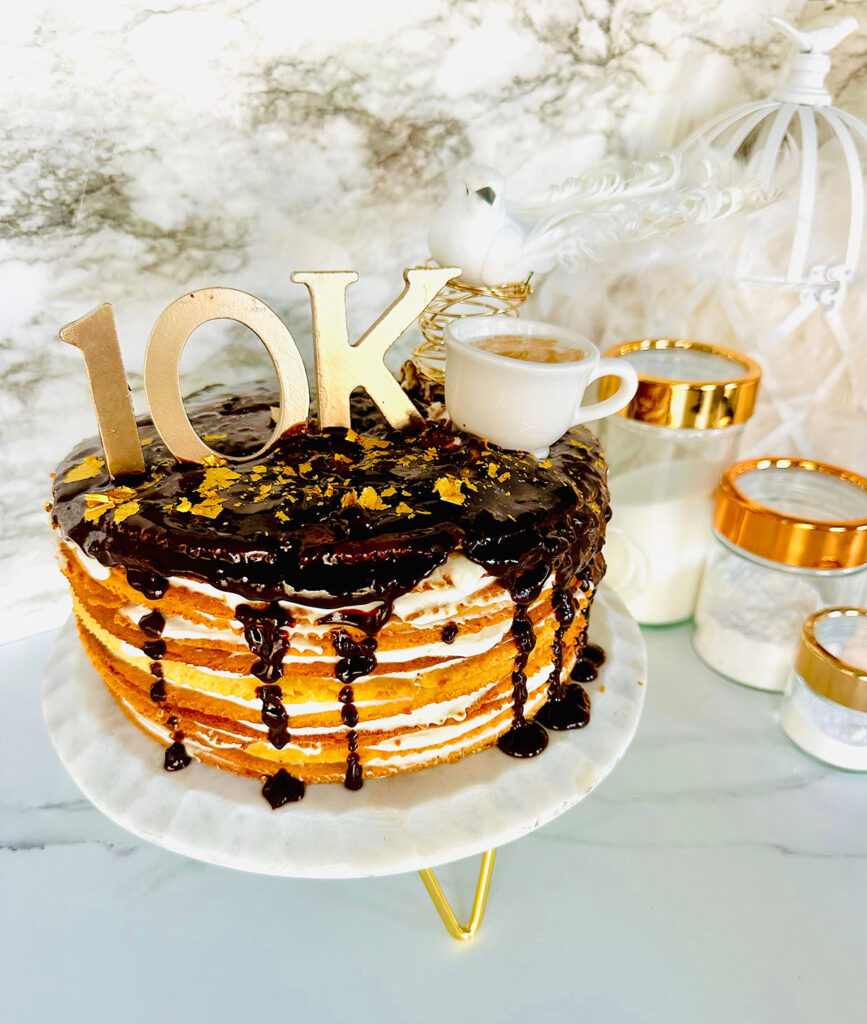
I would love to announce our milestone of reaching 10K followers on Instagram this week! So, it was the perfect time to make my favorite dessert of all time as a celebration called Bird’s Milk Cake! This cake has 10 buttery layers of biscuit dough filled with a light fluffy vanilla-flavored cream topped with a yummy lava flow of chocolate. Although this cake is time-consuming to make, the richness in flavors of the dough is made and cooked in a way that makes its unique state stand out to perfection! Whether you accompany your cake or taste it solo, it will make everyone’s sweet tooth take over completely!
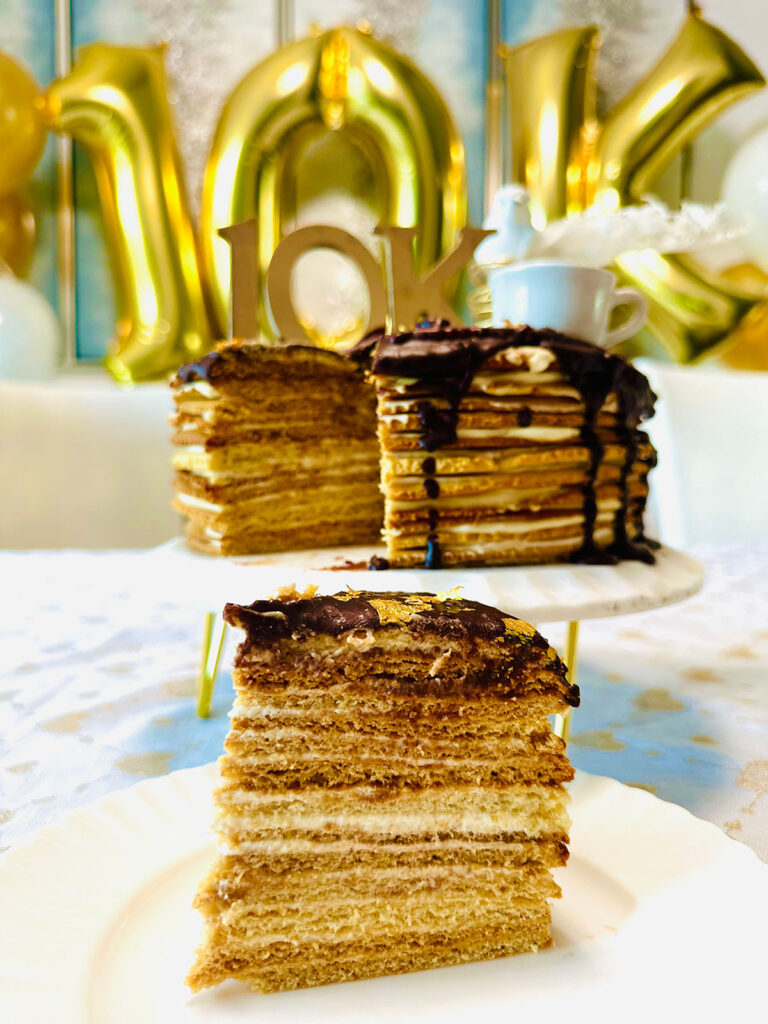
I noticed some Birdsmilk cakes have layers of cocoa-flavored biscuit dough, but I love this one instead! I also noticed this cake is made the same way as the popular Russian “Honey Cake”. This cake is somewhat time-consuming, but way worth it in the end!
I’ll be honest, I still need practice when it comes to chocolate layer toppings! The glaze topping of my cake was not to my liking! I wasn’t a fan of how the “look” of the chocolate came out! The topping is usually smooth and thick! Next time, I would pour an extra layer of chocolate and smooth it out better! But the taste is amazing! 😉 I would recommend making this cake! Even though the topping didn’t come out smooth, the mixture of the softly rich chocolate combined with the lightly buttered layers of biscuit cake makes it seem like you are in Willy Wonka’s chocolate factory! This cake makes me bonkers every time I try it! And now it’s time to share it with you!
My first time having this cake was from a bakery in LA. But, I have to say, seriously prefer this cake over any cake at any bakery shop and let me tell you why! I noticed a pattern in most of our local Armenian bakery shops have the same type of cake. It is either Mocha, Vanilla, or Chocolate cake, and if we’re lucky we’ll find berry-filled or custard which is usually rare to find.
Maybe it’s just my luck but I always walk towards the back of these bakery shops and pick the same pastry “Birdsmilk Cake”! If it’s a birthday or invited as a guest to someone’s house I’ll end up walking to the back of these bakery shops where the tall refrigerators stand and pick Birdsmilk cake instead! Okay, it’s finally time to tell you a little history behind this lovely cake!
This post contains referral links to products we have used or similar to the items used in this recipe. Galore Of Flavors earns a small commission on these links at no cost. You can find more products like these on our “Shop My Favorites” on our homepage! ♡
IN THIS POST: EVERYTHING YOU NEED TO KNOW TO MAKE THE PERFECT BIRDSMILK CAKE (PTASIE MLECZKO)
- 🕰️HISTORY BEHIND BIRDS MILK CAKE
- 🍴INGREDIENTS YOU’LL NEED TO MAKE THIS BIRDSMILK CAKE
- STEPS TO MAKE THIS CLASSIC BIRDSMILK CAKE (PTASIE MLECZKO)
- PREFER TO WATCH STEP-BY-STEP RECIPE VIDEO INSTEAD OF READING?
- JUMP TO RECIPE CARD
🕰️HISTORY BEHIND BIRDS MILK CAKE
This cake is considered to be a Russian pastry, but its real origins lie in Poland. It started back in 1936 when a confectionery company invented a new type of ”sweet”. Basically, it was a rectangular square of chocolate that was filled with an airy-like milk filling (or milk-based cream). A Polish pastry chef named it “Ptasie Mleczko” which translates to “Bird’s Milk”. Russians soon discovered this delicious pastry and altered the recipe to become a cake rather than a block of chocolate. In modern days, as a result, Ptasie Mleczkohas / Birds Milk Cake’s reputation and form have come a long way and everyone has learned to love this pasty including my family and me!
Shop Items from this recipe!
🍴INGREDIENTS YOU’LL NEED TO MAKE THIS BIRDSMILK CAKE
Here is a preview of the ingredients you’ll need to make this recipe! You can find these at your local grocery store or you can shop online. (Detailed Ingredients in Recipe Card down below)
Dough
- All Purpose Flour (Sifted)
- Powdered Sugar
- Heavy Whipping Cream
- Sour Cream
- Baking Soda
- Large Eggs
- Unsalted Butter
- Honey
- Sugar
Chocolate Glaze
- Semisweet Chocolate
- Heavy Whipping Cream
- Sugar
- Water
Toppings
- Golden Edible Flakes (optional) – can be found at any craft store in the baking section.
STEPS TO MAKE THIS CLASSIC BIRDSMILK CAKE (PTASIE MLECZKO)
💡Here are a few things to know before you start creating this recipe:
- Plan ahead! In order to make this cake perfect in taste, making the cake the day before will allow the flavors to absorb and combine to create an amazing taste! I recommend making the cake at least two days before.
- Do not overbake the cake layers! When baking each layer of the cake, it is highly recommended to cook it slightly until it is lightly browned” because overbaking the dough will cause the pastry to be on the dry side.
- Do not overfold the cream! Constant folding will cause the cream to deflate and lose its natural fluffiness. Avoid this by folding the cream until you feel the consistency being fluffy.
- Another key point is to make sure to melt the chocolate completely and continue to stir vigorously. Make sure to cool off the chocolate for a few minutes before pouring it over the cake.
- You will need a double-boiler for this recipe. If you do not have one all you’ll need is a medium size pot place a heat-proof bowl over it and set your fire on medium-high heat. Always be careful when handling the hot bowl!
If you like, keep scrolling down to the printable recipe card for a list of full ingredients and instructions. You can also click on the “Jump to Recipe” button at the top of the page! 😀
Dough Instructions:
Step 1: Preheat oven to 375° (190 Celsius)
Step 2: Begin melting your butter in a large double-boiler bowl until the butter has melted. Add sugar mix in until dissolved then add your honey and combine. Beat eggs separately in a bowl and gradually add beaten eggs as you mix vigorously into the melted butter mixture and remove the bowl from the heat.
Note: When removing the bowl from the double boiler, always be careful when handling the hot bowl!
Step 3: As soon as you remove from heat, pour baking soda and vanilla into the mixture and mix. Gradually add sifted flour until it’s fully incorporated until your dough mixture forms into a soft sticky soft dough ball. Knead by hand for a few minutes and add some flour if the dough tends to be too sticky. You will need to leave about 1/2 cup of flour for kneading.


Step 4: Form dough into a long loaf. Divide dough into 6 pieces. Pre-cut parchment paper to fit the baking sheet in advance. On each parchment paper, sprinkle some flour over it and roll out each dough into your desired shape as thin as you can get it! Cut off edges and use them for the next batch. I rolled my dough out about 1/8″ thick. Hold parchment paper with one hand and roll a rolling pin by the palm of your hand to open the dough easily. I used a small plate to shape and cut my dough into (you can have your cake round or square). Bake each sheet for about 5-6 minutes until golden brown. Repeat this process for all 10 layers until all are baked and done.


Step 5: Place sheets of cake on a cooling rack and wait until the cake completely cools off.
Cream Instructions:
Step 6: Whip heavy whipping cream in a medium-sized bowl with a hand mixer on low speed. Whip until it reaches fluffy soft peaks. Add powdered sugar to sour cream mix together and then fold in sour cream into whipped whipping cream gently.


Step 7: Start layering your cake one layer at a time. Place a spoon of cream in the center of your platter. This will allow your cake not to slip out of place. Spread 1/8″ thick of cream evenly over your sheet dough. Continue this until you reach your 10th layer.
Chocolate Glaze:
Step 8: In a medium saucepan, combine cream, sugar and water and bring to a simmer until sugar has dissolved. Add chocolate and stir continuously until completely melted. Set aside and allow this to cool off slightly to a warm temperature before spreading over the top of the cake. Pour chocolate glaze over the cake to the amount you like.


Step 9: Set in the fridge and allow the cake to chill overnight.
Tip: The best time to serve this cake is after several days in the fridge! I noticed this cake tasted way better after a few days! Enjoy 😋
Shop Items from this recipe!
PREFER TO WATCH STEP-BY-STEP RECIPE VIDEO INSTEAD OF READING?
Have you tried making our recipe yet? If so, we would LOVE to hear how it turned out! You can rate and comment down below and on Instagram! 👇 Thank you in advance!
RECIPE CARD
⭐⭐⭐⭐⭐
Print
The Classic Birdsmilk Cake (Ptasie Mleczko)
- Total Time: 1 hour 30 minutes
- Yield: 10 pieces 1x
Description
The Classic Birdsmilk Cake (Ptasie Mleczko)
I would love to announce our milestone of reaching 10K followers on Instagram this week! So, it was the perfect time to make my favorite dessert of all time as a celebration called Bird’s Milk Cake! This cake has 10 buttery layers of biscuit dough filled with a light fluffy vanilla-flavored cream topped with a yummy lava flow of chocolate. Although this cake is time-consuming to make, the richness in flavors of the dough is made and cooked in a way that makes its unique state stand out to perfection! Whether you accompany your cake or taste it solo, it will make everyone’s sweet tooth take over completely!
Ingredients
Dough & Cream
- 3 cups All Purpose Flour (Sifted)
- 1 teaspoon Powdered Vanilla
- 1 cup Powdered Sugar
- 1 cup Heavy Whipping Cream
- 3 cups Sour Cream
- 2 1/4 teaspoons Baking Soda
- 3 Large Eggs
- 4 ounces Unsalted Butter
- 3 teaspoons Honey
- 1/2 cup Sugar
Chocolate Glaze
- 100 grams Semisweet Chocolate
- 1/2 cup Heavy Whipping Cream
- 2 tablespoons Sugar
- 2 tablespoons Water
Toppings
-
Golden Edible Flakes (optional) – can be found at any craft store in the baking section.
Instructions
- Dough Instructions: Preheat oven to 375° (190 Celsius)
- Begin melting your butter in a large double-boiler bowl until the butter has melted. Add sugar mix in until dissolved then add your honey and combine. Beat eggs separately in a bowl and gradually add beaten eggs as you mix vigorously into the melted butter mixture and remove the bowl from the heat.
- As soon as you remove from heat, pour baking soda and vanilla into the mixture and mix. Gradually add sifted flour until it’s fully incorporated until your dough mixture forms into a soft sticky soft dough ball. Knead by hand for a few minutes and add some flour if the dough tends to be too sticky. You will need to leave about 1/2 cup of flour for kneading.
- Form dough into a long loaf. Divide dough into 6 pieces. Pre-cut parchment paper to fit the baking sheet in advance. On each parchment paper, sprinkle some flour over it and roll out each dough into your desired shape as thin as you can get it! Cut off edges and use them for the next batch. I rolled my dough out about 1/8″ thick. Hold parchment paper with one hand and roll a rolling pin by the palm of your hand to open the dough easily. I used a small plate to shape and cut my dough into (you can have your cake round or square). Bake each sheet for about 5-6 minutes until golden brown. Repeat this process for all 10 layers until all are baked and done.
- Place sheets of cake on a cooling rack and wait until the cake completely cools off.
- Cream Instructions: Whip heavy whipping cream in a medium-sized bowl with a hand mixer on low speed. Whip until it reaches fluffy soft peaks. Add powdered sugar to sour cream mix together and then fold in sour cream into whipped whipping cream gently.
- Start layering your cake one layer at a time. Place a spoon of cream in the center of your platter. This will allow your cake not to slip out of place. Spread 1/8″ thick of cream evenly over your sheet dough. Continue this until you reach your 10th layer.
- Chocolate Glaze: In a medium sauce pan, combine cream, sugar and water and bring to a simmer until sugar is dissolved. Add chocolate and stir continuously until completely melted. Set aside and allow this to cool off slightly to a warm temperature before spreading over the top of the cake. Pour chocolate glaze over the cake to the amount you like.
- Set in the fridge and allow the cake to chill overnight.
Tip: The best time to serve this cake is after several days in the fridge! I noticed this cake tasted way better after a few days! Enjoy 😋
Notes
- Plan ahead! In order to make this cake perfect in taste, making the cake the day before will allow the flavors to absorb and combine to create an amazing taste! I recommend making the cake at least two days before.
- Do not overbake the cake layers! When baking each layer of the cake, it is highly recommended to slightly bake it until it is lightly browned” because overbaking the dough will cause the pastry to be on the dry side.
- Do not overfold the cream! Constant folding will cause the cream to deflate and lose its natural fluffiness. Avoid this by folding the cream until you feel the consistency being fluffy.
- Another key point is to make sure to melt the chocolate completely and continue to stir vigorously. Make sure to cool off the chocolate for a few minutes before pouring it over the cake.
- You will need a double-boiler for this recipe. If you do not have one all you’ll need is a medium size pot place a heat-proof bowl over it and set your fire on medium-high heat. Always be careful when handling the hot bowl!
*** Our Nutrition information is estimated, so please make sure to check your own calculation to fit your diet.
- Prep Time: 30 minutes
- Cook Time: 1 hour
- Category: Dessert
- Method: Baked
- Cuisine: Russian
⭐⭐⭐⭐⭐
WRITE US A REVIEW BELOW ⬇️
We would love to hear your thoughts if you tried out our recipe! 😊



this cake is so creamy and delicious! i made it and it was exactly like a bakery! thank u for ur details and explanation, this was done very well. 🙂