
This Tasty & Easy Pistachio Tiramisu | No-Bake Dessert is the perfect modern twist on my classic favorite recipes! Firstly, it’s made with espresso-soaked ladyfingers, rich mascarpone, and a smooth pistachio cream filling. This recipe adds a fun and flavorful twist to the traditional tiramisu. Its nutty pistachio taste, combined with rich creaminess, creates a magical combination, especially with the bold espresso complementing it perfectly. Altogether, this no-bake dessert is super easy to make, incredibly delicious, and packed with unique flavors!
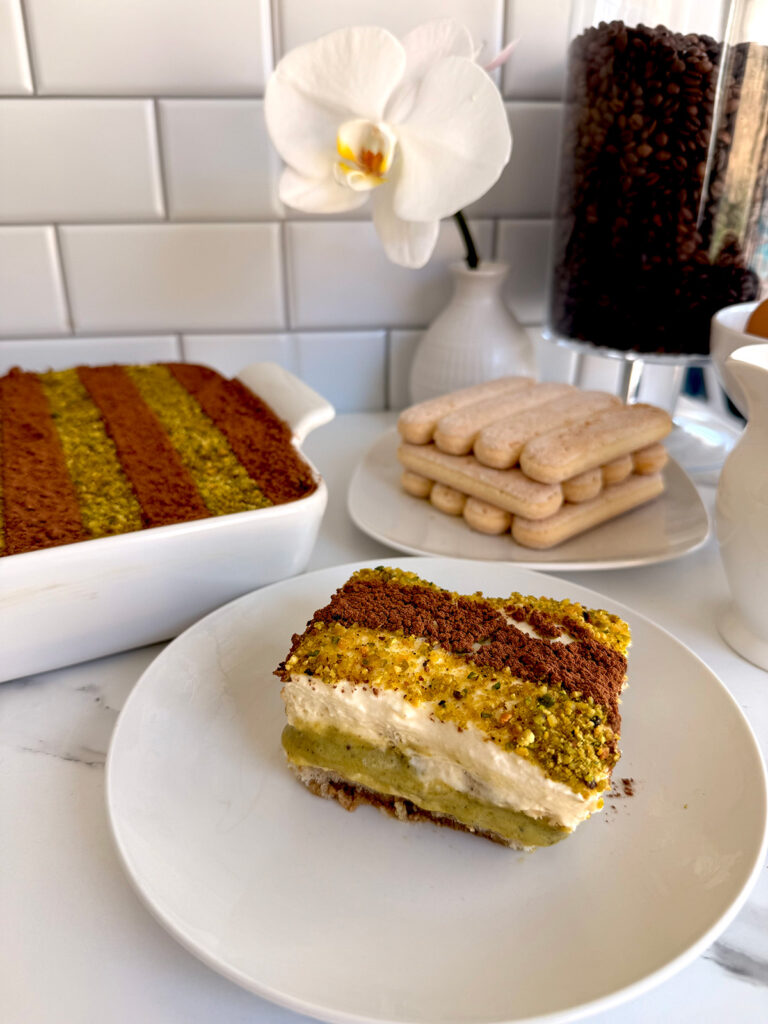
The result of this dessert is simply delicious! From the first bite, this combination of bold, bitter espresso with creamy pistachio and rich mascarpone creates an unforgettable flavor. In fact, I might even consider making this my favorite dessert of all time! Not only does this nutty pistachio cream have a smooth, dreamy texture that you definitely won’t want to share. This recipe makes a large portion, enough to serve a party of 16 or more, but it’s so good, you may be tempted to keep the whole platter for yourself.
IN THIS POST: EVERYTHING YOU NEED TO KNOW TO MAKE THE PERFECT TASTY & EASY PISTACHIO TIRAMISU | NO-BAKE DESSERT
- THE ULTIMATE GUIDE TO SERVING TIRAMISU
- CAN YOU MAKE TIRAMISU AHEAD OF TIME?
- KEY INGREDIENTS TO THIS PISTACHIO TIRAMISU
- 🍴INGREDIENTS YOU’LL NEED TO MAKE THIS PISTACHIO TIRAMISU
- STEPS TO MAKE THIS DESSERT
- PREFER TO WATCH STEP-BY-STEP RECIPE VIDEO INSTEAD OF READING?
- JUMP TO RECIPE CARD
THE ULTIMATE GUIDE TO SERVING TIRAMISU
Want that fancy, restaurant-style dessert at your next event, birthday, or holiday gathering? Look no further than Tiramisu, it’s a versatile dessert that’s perfect for any occasion. It fits beautifully at holiday parties like Christmas, New Year’s, and Valentine’s Day. Pistachio tiramisu is especially ideal for “green-themed” celebrations, such as Christmas with a green color theme or St. Patrick’s Day.
It’s also perfect for spring holidays like Easter and Mother’s Day, where its homemade elegance makes it feel extra special. During the summer and fall, it’s a wonderful choice for the Fourth of July, Father’s Day, Thanksgiving, and even Halloween. Tiramisu also shines at bridal showers, anniversaries, and baby showers, adding a sophisticated touch to any dessert table.
With its rich, elegant presentation and delicate cocoa powder finish, this dessert looks just as luxurious as it tastes!
Can You Make Tiramisu Ahead of Time?
Yes! In fact, making tiramisu a few days in advance allows the flavors to meld beautifully, resulting in an even more delicious dessert. One of the best things about tiramisu is that it also freezes wonderfully!
I made an entire tray of tiramisu, and as tempting as it was, I didn’t want to eat it all at once. I had it in the fridge for a few days, then decided to store it away in the freezer. So, I placed it in an airtight container, tucked it into a freezer-safe bag, and froze it to enjoy later or share with family. I ended up freezing my tiramisu for up to four months!
When you’re ready to serve, simply move it from the freezer to the fridge to thaw. By the next day, it’s perfectly creamy, flavorful, and ready to enjoy, just like freshly made!
Key Ingredients in This Pistachio Tiramisu
Lady Fingers– These are dry, light, and airy sponge cookies with a very mild, delicate flavor. Once soaked in espresso, they become soft and sponge-like, absorbing all the rich coffee flavor. Their subtle taste makes them perfect for tiramisu, as they allow the espresso and cream layers to shine. While you can make ladyfingers from scratch, I chose to keep this recipe simple and no-bake by using the prepackaged version from the store. You can usually find them in the cookie or international foods section.
Mascarpone Cheese – Mascarpone has a mild, creamy flavor similar to cream cheese but richer and silkier. For the best results in this tiramisu, choose a thick, high-quality mascarpone as your base. You can gently whip or soften it slightly to make it easier to mix with the pistachio cream, but be careful not to overwork it as it can become grainy. Keeping the mixture chilled will help it stay firm and maintain its smooth, luxurious texture once the tiramisu is assembled and refrigerated.
Homemade Pistachio Cream – This creamy, nutty spread is made from ground pistachios combined with sweetened condensed milk, a bit of oil, and powdered sugar. The condensed milk gives it a rich, smooth sweetness, while the oil helps achieve a silky, spreadable texture. Powdered sugar balances the nutty flavor and ensures the cream is smooth and lump-free. This homemade pistachio cream adds a fresh, vibrant flavor to the tiramisu and blends beautifully with the mascarpone for a luxurious, indulgent layer. If you opt for a store-bought version, choose one that’s not too thick, as overly dense cream can weigh down your layers.
Coffee – A strong espresso is the key component of this tiramisu! Its rich, bold flavor pairs perfectly with the homemade pistachio cream and lightly whipped mascarpone filling. Be sure to use a strong coffee so its taste shines through alongside the other flavorful layers in the recipe.
🍴INGREDIENTS YOU’LL NEED TO MAKE THIS PISTACHIO TIRAMISU
Here is a preview of the ingredients you’ll need to make this recipe! You can find these at your local grocery store, or you can shop online. (Detailed ingredients in Recipe Card down below) ⬇️
SOAKED COFFEE LADYFINGERS
- Espresso Powder – (Instant coffee or strong brewed coffee)
- Granulated Sugar
- Water
- Rum
- Lady Fingers – (You could find them in the cookie aisle)
MOSCARPONE CREAM
- Eggs Yolks (eggs separated)
- Granulated Sugar
- Mascarpone
- Heavy Whipping Cream
- Vanilla extract
PISTACHIO CREAM
- Raw Unsalted Pistachios (unshelled)
- Condensed Milk
- Powdered Sugar
- Granulated Sugar
- Heavy Whipping Cream
- Vegetable Oil
TOPPINGS
- Crushed Unsalted Pistachios
- Unsweetened Coco Powder
MATERIALS NEEDED FOR BAKING AND DESIGN
- 13in x 9in x 2in – Baking Dish (Rectangular glass, ceramic, or metal pan can be used)
- Parchment Paper Strips (Cut 10×10 parchment paper into 1″ strips)
STEPS TO MAKE THIS DESSERT:
Step 1: Prepare the Coffee – Firstly, brew a strong coffee or espresso. I boiled water and added espresso powder, then poured it into a cup to cool. Stir in some sugar and a splash of rum (optional). Set aside to cool completely.
Step 2: Prepare the Egg Custard – Secondly, separate the egg yolks from the whites. Place the yolks into a heatproof bowl over a double boiler on medium heat. Add sugar and whisk constantly with a hand mixer until the mixture becomes light, pale, and fluffy—about 8–10 minutes. This creates a rich, creamy custard base.
Step 3: Soften the Mascarpone – In a separate bowl, gently soften the mascarpone cheese using a hand mixer or stand mixer on low speed. This makes it easier to fold into your cream mixture.
Step 4: Make the Cream Layer – In a large mixing bowl, whip the heavy cream until light and frothy. Gradually add the egg yolk custard and softened mascarpone, whisking until smooth and creamy. Cover with plastic wrap and chill while preparing the next components.
Step 5: Prepare the Pistachio Cream – In a food processor, grind roasted pistachios until finely textured. Add sweetened condensed milk and blend on low speed until combined. Then add powdered sugar, granulated sugar, and a bit of oil, blending until you achieve a light, silky-smooth paste.
Step 6: Assemble the First Layer – Using a 13” x 9” x 2” baking dish, quickly dip the ladyfingers in the cooled espresso, coating both sides. Arrange them side by side in a single layer to cover the bottom of the dish completely. Spread a layer of the mascarpone cream over the ladyfingers, then gently pour the pistachio cream evenly on top. Use a rubber spatula to spread carefully—avoid dumping it in the center to prevent the layers from separating.
Step 7: Assemble the Second Layer – Repeat with a second layer of espresso-soaked ladyfingers. Top this with the remaining mascarpone mixture, spreading evenly with a rubber spatula. Use a plastic cake scraper or offset spatula to smooth the top and create a clean, flat finish. Wipe your spatula between strokes for the neatest result.
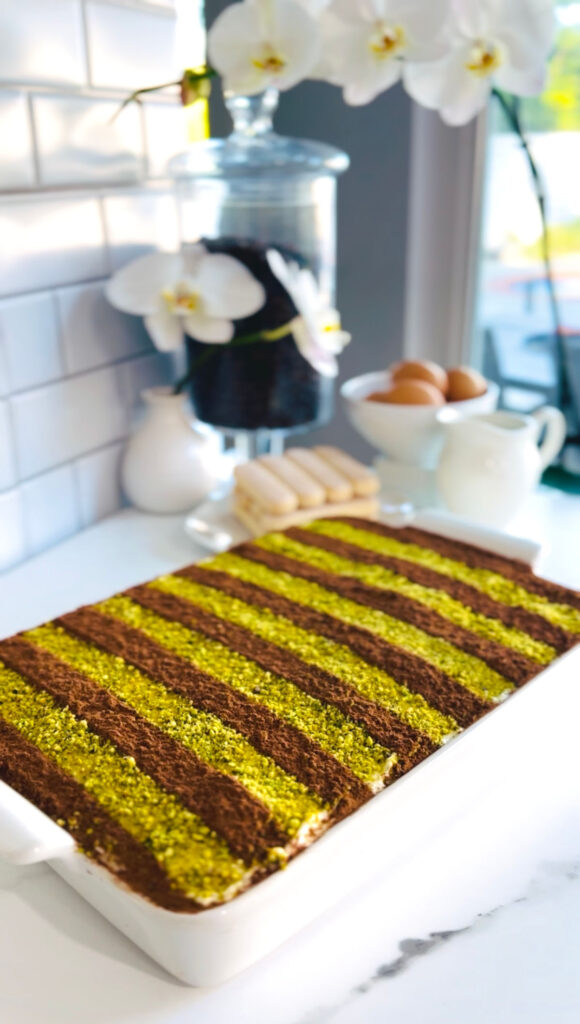
Step 8: Decorate and Chill – Lastly, sprinkle crushed pistachios over the top. Cut 6 strips of parchment paper about 10” x 1” each and lay them across the tiramisu 1” apart to create a pattern. Sift cocoa powder evenly over the top. Carefully lift the parchment strips, then clean the edges with a damp paper towel or cloth for a sharp finish. Refrigerate overnight to allow the flavors to meld before serving. Enjoy!
PREFER TO WATCH STEP-BY-STEP RECIPE VIDEO INSTEAD OF READING?
Have any questions about this recipe, or have you tried making our recipe yet? If so, we would LOVE to hear how it turned out! You can post, tag, rate, and comment down below and on Instagram! 👇 Thank you in advance!
RECIPECARD
⭐⭐⭐⭐⭐
WRITE US A REVIEW BELOW ⬇️
We would love to hear your thoughts if you tried out our recipe!😊
Print
Tasty & Easy Pistachio Tiramisu | No-Bake Dessert
- Total Time: 4 Hours + 30 Minutes
- Yield: 16 Servings 1x
Description
Tasty & Easy Pistachio Tiramisu | No-Bake Dessert
This Tasty & Easy Pistachio Tiramisu | No-Bake Dessert is the perfect modern twist on my classic favorite recipes! Firstly, it’s made with espresso-soaked ladyfingers, rich mascarpone, and a smooth pistachio cream filling. This recipe adds a fun and flavorful twist to the traditional tiramisu. Its nutty pistachio taste, combined with rich creaminess, creates a magical combination, especially with the bold espresso complementing it perfectly. Altogether, this no-bake dessert is super easy to make, incredibly delicious, and packed with unique flavors!
Ingredients
FOR THE SOAKED COFFEE LADYFINGERS
- 3 Teaspoons Espresso Powder – (Instant coffee or strong brewed coffee)
- 1 Tablespoon Grandulated Sugar
- 1 1/2 cups Water
- 1 1/2 tablespoons Rum
- 2 packages – 17 ounces of Lady Fingers – (You could find them in the cookie aisle)
FOR THE MOSCARPONE CREAM
- 6 Eggs Yolks (eggs separated)
- 1/2 cup + 1 1/2 tablespoons Grandulated Sugar
- 24 oz Mascarpone
- 1 cup Heavy Whipping Cream
- 1/2 Tablespoon Vanilla extract
FOR THE PISTACHIO CREAM
- 2 cups Raw Unsalted Pistachios (unshelled)
- 1/2 cup Condensed Milk
- 1/4 cup + 1 1/2 tablespoons Powdered Sugar
- 1 cup Granulated Sugar
- 1/4 cup Heavy Whipping Cream
- 1/4 cup Vegetable Oil
TOPPINGS
- 1/2 cup Crushed Unsalted Pistachios
- 4 Tablespoons Unsweetened Coco Powder
Instructions
- Prepare the Coffee – Brew a strong coffee or espresso. I boiled water and added espresso powder, then poured it into a cup to cool. Stir in some sugar and a splash of rum (optional). Set aside to cool completely.
- Prepare the Egg Custard – Separate the egg yolks from the whites. Place the yolks into a heatproof bowl over a double boiler on medium heat. Add sugar and whisk constantly with a hand mixer until the mixture becomes light, pale, and fluffy—about 8–10 minutes. This creates a rich, creamy custard base.
- Soften the Mascarpone – In a separate bowl, gently soften the mascarpone cheese using a hand mixer or stand mixer on low speed. This makes it easier to fold into your cream mixture.
- Make the Cream Layer – In a large mixing bowl, whip the heavy cream until light and frothy. Gradually add the egg yolk custard and softened mascarpone, whisking until smooth and creamy. Cover with plastic wrap and chill while preparing the next components.
- Prepare the Pistachio Cream – In a food processor, grind roasted pistachios until finely textured. Add sweetened condensed milk and blend on low speed until combined. Then add powdered sugar, granulated sugar, and a bit of oil, blending until you achieve a light, silky-smooth paste.
- Assemble the First Layer – Using a 13” x 9” x 2” baking dish, quickly dip the ladyfingers in the cooled espresso, coating both sides. Arrange them side by side in a single layer to cover the bottom of the dish completely. Spread a layer of the mascarpone cream over the ladyfingers, then gently pour the pistachio cream evenly on top. Use a rubber spatula to spread carefully—avoid dumping it in the center to prevent the layers from separating.
- Assemble the Second Layer – Repeat with a second layer of espresso-soaked ladyfingers. Top this with the remaining mascarpone mixture, spreading evenly with a rubber spatula. Use a plastic cake scraper or offset spatula to smooth the top and create a clean, flat finish. Wipe your spatula between strokes for the neatest result.
- Decorate and Chill – Sprinkle crushed pistachios over the top. Cut 6 strips of parchment paper about 10” x 1” each and lay them across the tiramisu 1” apart to create a pattern. Sift cocoa powder evenly over the top. Carefully lift the parchment strips, then clean the edges with a damp paper towel or cloth for a sharp finish. Refrigerate overnight to allow the flavors to meld before serving. Enjoy!
Notes
MATERIALS NEEDED FOR BAKING AND DESIGN
- 13in x 9in x 2in – Baking Dish (Rectangular glass, ceramic, or metal pan can be used)Parchment Paper Strips (Cut 10×10 parchment paper into 1″ strips)
*** Our Nutrition information is estimated, so please make sure to check your own calculations to fit your diet.
- Prep Time: 30 Minutes
- Category: Dessert
- Cuisine: Italian, Mediterranean
⭐⭐⭐⭐⭐
WRITE US A REVIEW BELOW ⬇️
We would love to hear your thoughts if you tried out our recipe!😊

This is such a delicious recipe thank you for sharing with all of us. Easter coming out so this will be a spectacular and delicious dessert to have on our table again You’re delicious recipe with us.
Thank you so much for the wonderful comment! Yes, its great for Easter and St. Patricks day too! 🥰