Description
The Best No-Bake Kadayif/Kanafeh Cheesecake
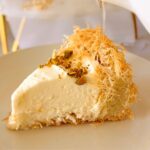
Everyone has their own idea of the “perfect” cheesecake, but what if you gave it a twist that no one saw coming? This is one of The Best No-Bake Kadayif/Kanafeh Cheesecake that features a golden, crispy base made from Kadayif—shredded phyllo dough commonly used in Middle Eastern desserts. On top of that crunchy foundation is a luxuriously creamy filling made with whipped cream cheese and fluffy whipped cream, then finished with a drizzle of delicate rose water syrup for a floral, fragrant touch. This dessert isn’t just delicious—it’s a showstopper, guaranteed to be the highlight of any celebration.
Ingredients
Units
Scale
CHEESECAKE FILLING
- 16 oz Cream Cheese
- 1/4 cup Sour Cream
- 1/2 cup Granulated Sugar
- 1 cup Heavy Whipping Cream
- 1 cup Powdered Sugar
- 1 teaspoon Powdered Vanilla
- 3 tablespoons Rose Water
ROSE WATER SYRUP
- 2 cups Purified Water
- 3 1/4 cup Granulated Sugar
- 3 tablespoons Rose Water
- 1 tablespoon Lemon Juice
TOPPINGS
- Crushed Pistachios
Instructions
- Start by placing the Kadayif in a large bowl and gently pulling apart the strands to loosen and separate them. Melt the butter and pour it evenly over the Kadayif, then use your hands to gently massage it in until the strands are fully coated.
- To form the base, take a portion of the buttered Kadayif and press it evenly into the bottom of a springform pan, creating a flat, compact layer about 1/4 inch thick. Once the base is in place, insert the inner ring of the springform pan. Carefully pack the remaining Kadayif around the sides, making sure to firmly press it in so there are no gaps or loose spaces. This will help create a sturdy and even crust that holds its shape when filled.
- Preheat your oven to 400°F (200°C) and place the prepared Kadayif base inside. Bake until it turns a beautiful golden brown and becomes crisp. While the base is baking, place the cream cheese in a mixing bowl and begin blending on low speed until it becomes smooth and softened. In a separate bowl, whip the heavy cream until it forms soft to stiff peaks, being careful not to overwhip. Next, add the granulated sugar, powdered sugar, powdered vanilla, and sour cream to the softened cream cheese. Gently fold in the whipped cream along with the rose water, combining just until smooth and well incorporated. Avoid overmixing to maintain a light, airy texture. Place in the fridge to chill as your Kadayif base bakes in the oven.
- Once the Kadayif base is baked, allow it to cool completely before handling. Begin by carefully removing the outer springform ring and setting it aside. Then, gently work on removing the inner ring—but do not unlatch the lock on the pan just yet. To lift the inner pan without damaging the delicate Kadayif crust, slowly and gently guide it upward. Instead of pulling it straight up, try softly “wiggling” it as you lift to loosen it gradually. Avoid rushing this step, as removing the pan too quickly or forcefully may cause the outer layer to crack or lose its shape. If you prefer, you can leave the outer ring in place for added support while you remove the inner pan first. Personally, I found it easier to remove the outer ring first, then carefully lift out the inner section
- Pour the cheesecake filling into the prepared Kadayif base, spreading it evenly. Using a pastry brush or offset spatula, gently swirl and smooth the surface to create a level, decorative pattern on top. Once the filling is evenly distributed, cover the top of the springform pan with plastic wrap, making sure it’s sealed around the edges. Refrigerate the cheesecake overnight to allow it to fully set.
- Syrup: Place water and sugar in a medium saucepan and bring to a boil until sugar has dissolved while stirring occasionally. Allow syrup to cool off slightly, then add rose water and lemon to boil for 2 minutes on medium heat. You will notice the consistency of the mixture has thickened. Completely cool, then, place in a small pitcher, put plastic wrap over the syrup, and refrigerate overnight. Use syrup when ready to serve, top off your cheesecake with crushed pistachios, and enjoy!
Notes
*** Our Nutrition information is estimated, so please make sure to check your own calculations to fit your diet.